


top: self-made shoes: steve madden pants: oasap (I took in these floral pants - tutorial coming tomorrow)
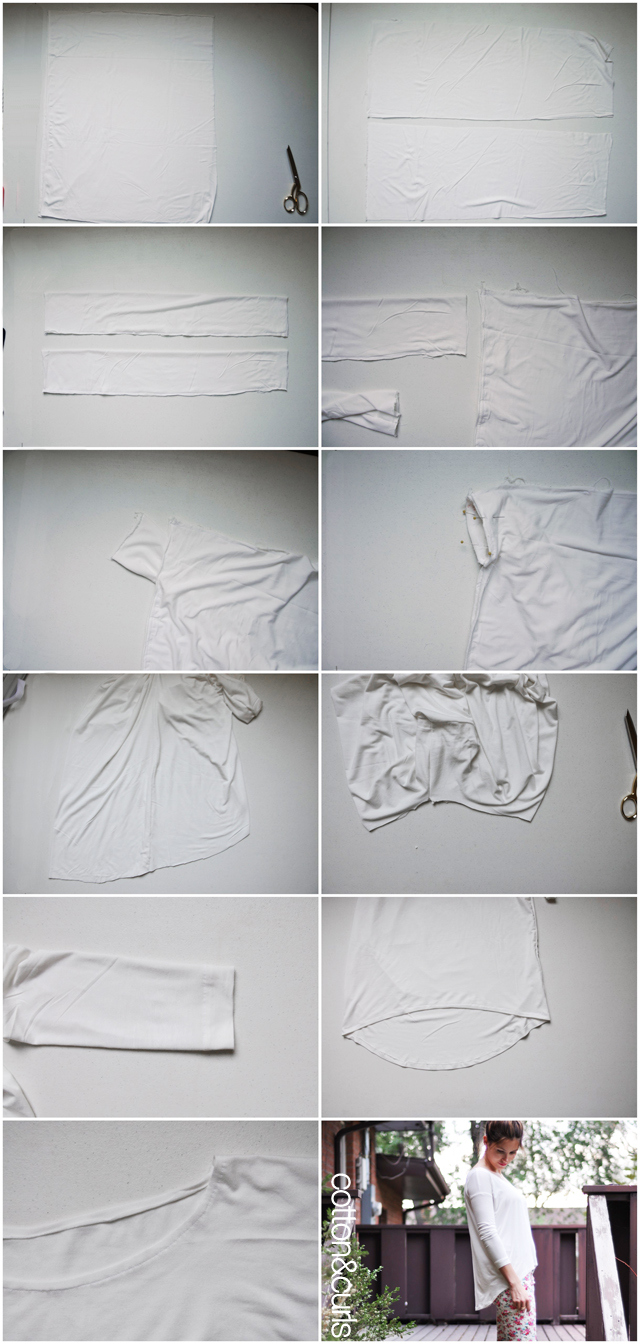
Super easy top to make and comfy to wear. All you need is to measure and cut out 3 rectangles, then sew them up and together and you are left with a top that can be worn casually or dressy. Whether you tuck it into a skirt or leave it hanging out with a pair of jeans.
Love when my boys crash the shoot! Ollie was getting fed up and Beck was chucking pears and dirt all over the place. At least I got a few pictures taken.
Supplies:
1 yard of thin stretchy knit material (Mine is from Joanns)
scissors
flexible measuring tape
sewing machine
thread
Instructions:
1. Measure around 4" to 5" past your shoulder (wear your should seam usually sits) to get your new sleeve seam. This will be the width of your shirt. Measure how long you want the low part of the shirt to be in the back. Cut out 2 pieces (stretch running from right to left, i.e. the sleeve seams) with those measurements with seam allowances.
2. Cut out the sleeves by measuring from where your shoulder seams are going to hit to your desired length of sleeve. I wanted mine to my wrist because I want to wear this in the upcoming fall and winter. Make the width the length around your arm at whatever tightness you want. Test it by stretching it around your arm.
3. Sew up the sleeves into tubes. Try these on to make sure you like the fit.
4. Measure the width of the tubes at where it is going to be joined to the shirt. Use this measurement when you sew up the 2 big shirt pieces together at the side seams, leave out a space on both sides at the top that is the same measurement as the sleeve width. Sew up the shoulder seams to where you want the neckline to start.
5.Turn the shirt pieces inside out and the tube right side out and slide it into the shirt.
6. Pin and sew up the armholes.
7. Lay the top out so the side seams are touching, cut the bottom low in the front and long in the back. I keep trying it on to make sure that it is where I want it to hit and keep cutting till I like how it looks.
8. Cut out the neckline by lining up the sides seams and rounding out the front and back openings at the top of the shirt. I keep trying it on to make sure that it where I want it to hit and keep cutting till I like how it looks.
9. Hem the sleeve by folding the edge under a quarter inch, then again an inch and a half. Then I stretch the sleeve as I sew a long straight stitch.
10. Fold under once 3/4" and sew a straight stitch.
11. Hem the neckline by slowly folding a 1/2" under and sewing a straight stitch.
Who just had a baby? You look amazing!!!!! For real!
ReplyDeleteLove the top!!
Jen
sewfabulous-now.blogspot.com
The last photo with your babies is too cute for words <3
ReplyDeleteChristina, bohemianwild.blogspot.com
Oh! Those sweet baby cheeks!
ReplyDeleteThat shirt looks so comfy!
This looks so comfy to wear, I might have a go at making this.
ReplyDeleteI'm looking forward to wearing some ordinary clothes once I have had my baby. I'm overdue now! Seeing photos of your little one is making me impatient to see my baby!
http://boyandbunnyblog.blogspot.co.uk/
I like your tutorials :) Your babies is so cute :)
ReplyDeleteyou look SO gorgeous!
ReplyDeletewww.modernsuburbanites.blogspot.com
OMG, you look soooo fab!
ReplyDeleteI can't wait to make this! I have some white jersey knit that I bought at a thrift store for $1 at the beginning of summer and I've been debating what to do with it.
ReplyDeletewww.domesticatedworkingwoman.blogspot.com
I love this tutorial - it's super cute!! I am gonna have to make this.
ReplyDeleteYou look so fabulous, even just after having your baby!!!
Thank you for posting these wonderful tutorials. I always look forward to it.
i love your style! very pretty. x
ReplyDeleteannem
www.lovelyunnecessities.blogspot.com
Seriously cute!!! This is going on the 'To-do' list for my daughter. She will LOVE it and I will be the BEST mom ever! Thanks for sharing and adorable pics! :-)
ReplyDeletelove your tutorials!!! you're such an inspiration!
ReplyDeleteThanks, I love your DIYs!!!! Kisses from BRazil!!!
ReplyDeleteI like ur son dress,the one who stand by ur side...kisses on ur son cheeks :))))).Greeting from Thailand and u r my inspiration!!!!!
ReplyDeleteAww. Sooo adorable :)))
ReplyDeletehttp://misscielofernando.blogspot.com
love it! gorgeous!!!
ReplyDeleteMost. Awesome. Pants. EVER! And you look fabulous by the way!
ReplyDeleteAmazing! Thank you for the amazing tutorials!
ReplyDeletehttp://seelovemake.blogspot.com
You are super mom. If you can wear those heels and hold a baby. You are amazing.
ReplyDeleteTwo adorable babies, oozing creativity AND execution of her ideas, great body, obviously mounds of energy - mmm ..... can you bottle some of the energy and send it to me in Africa? :)
ReplyDeletehttp://findingprettyagain.blogspot.com
This is just the perfect sort of top, I'd love to see a video tutorial of this - the draped shape of the top is so fab!
ReplyDeletelove your top and skinny pant.
ReplyDeleteWonderful dress to wear on.
http://www.shopjessicabuurman.com/lookbook-street-fashion_c314